
Understanding LiftMaster remote control programming can save time and prevent frustration when setting up your garage system. Modern garage door systems offer unmatched convenience and security, and LiftMaster remotes are among the most reliable options available. Whether you’re replacing a lost remote, adding a new one, or troubleshooting your existing device, this guide provides clear, step-by-step instructions, practical tips, and troubleshooting strategies to ensure your LiftMaster remote operates flawlessly.
Understanding Your LiftMaster Remote
Before diving into programming, it’s crucial to understand the components of your remote system:
- Remote Types: LiftMaster offers single-button, multi-button, and universal remotes. Knowing your model simplifies programming.
- Compatibility: Ensure your remote is compatible with your garage door opener. Older units may require specific programming methods.
- Power Source: Check that your remote has fresh batteries to avoid interruptions during programming.
Preparing for Remote Programming
Preparation can prevent frustration and save time:
- Read the Manual: Each LiftMaster remote may have unique steps. Familiarize yourself with your model’s guide.
- Locate the “Learn” Button: This button, found on the garage door opener motor, is essential for programming.
- Clear Previous Settings (Optional): If you are resetting the system, clear old codes to avoid conflicts.
- Have Multiple Remotes Ready: If you plan to program several remotes, do them in one session for efficiency.
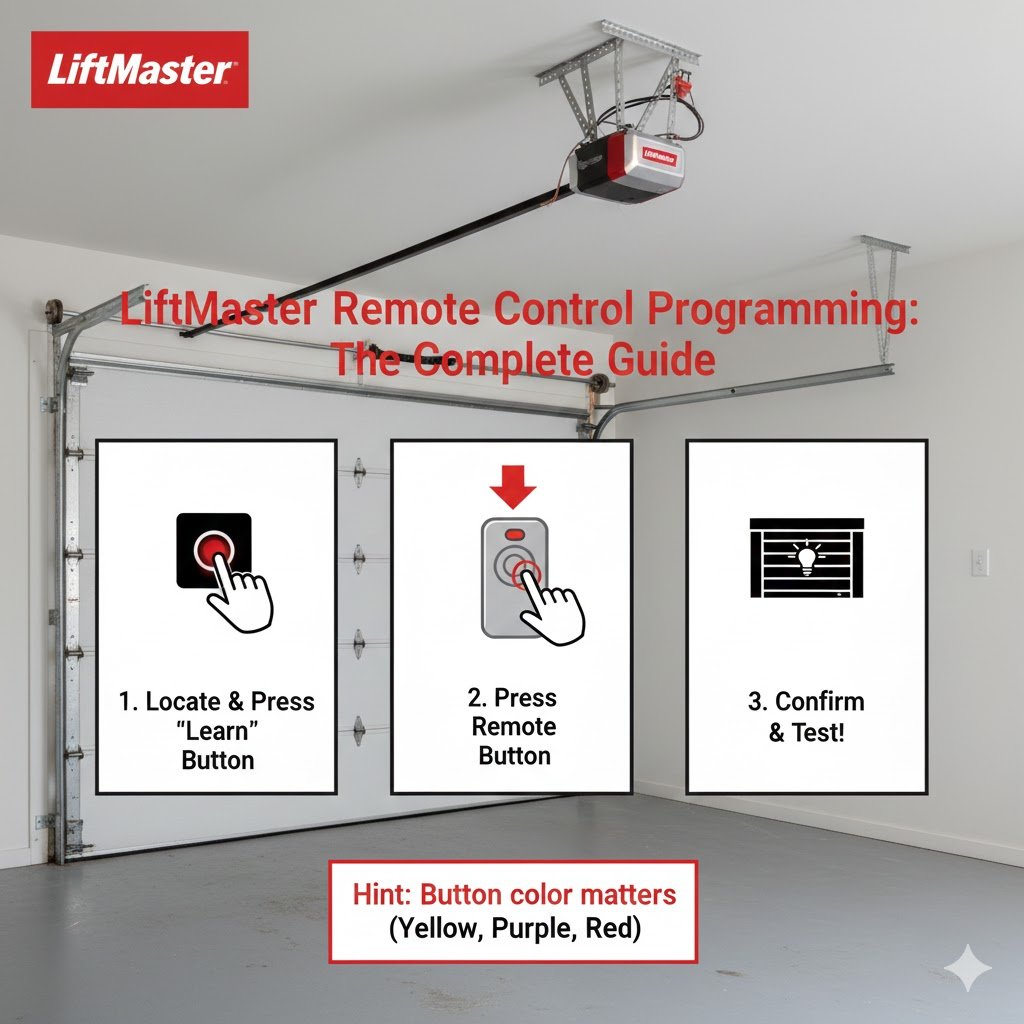
Step-by-Step LiftMaster Remote Control Programming
Programming your LiftMaster remote generally involves the following steps:
1. Access the Learn Button
- Open the garage door opener housing.
- Locate the Learn button (usually near the antenna wire).
2. Prepare the Remote
- Press and release the desired button on the remote.
- The indicator light on the opener may blink, signaling readiness.
3. Program the Remote
- Press the Learn button on the opener for about 5 seconds until the LED indicator activates.
- Within 30 seconds, press the remote button again.
- The garage door should respond with a click or movement, confirming successful programming.
4. Test the Remote
- Press the programmed button to ensure the door operates smoothly.
- Repeat for additional buttons or remotes as needed.
Following these steps ensures your LiftMaster remote control programming is successful and reliable.
Alternative Programming Methods
Depending on your remote model, alternative methods may apply:
Using a Smart Hub
Some newer LiftMaster systems support smart hub integration, allowing remote programming via a mobile app. Steps generally include:
- Connect the smart hub to Wi-Fi.
- Open the app and select “Add Device.”
- Follow in-app instructions to link the remote.
Manual Synchronization
Older units may require holding the remote and opener buttons simultaneously for several seconds. Always refer to your manual for model-specific instructions. Using LiftMaster remote control programming methods carefully prevents errors and ensures consistent performance.
Troubleshooting Common Issues
Even with careful programming, issues may arise. Here are solutions to common problems:
- Remote Not Responding: Replace batteries and ensure proper alignment with the opener.
- Interference: Other wireless devices may disrupt signals; try moving them away.
- Multiple Remotes Conflict: Clear old codes and reprogram each remote individually.
- Obstructed Sensor: Ensure garage door sensors are clean and unobstructed.
Revisiting your LiftMaster remote control programming steps can often resolve these issues quickly.
Tips for Maintaining Your Remote
Proper maintenance ensures long-lasting performance:
- Battery Care: Replace batteries annually or when performance drops.
- Keep it Dry: Avoid moisture exposure, which can damage internal circuits.
- Avoid Physical Damage: Prevent drops or heavy impacts.
- Regular Testing: Periodically test all programmed buttons.
Regularly checking your LiftMaster remote control programming settings helps maintain consistent performance.
Case Study: Programming a LiftMaster 893LM Remote
Scenario: A homeowner recently purchased a LiftMaster 893LM and needed to program it to an existing opener.
Process:
- Located the Learn button on the opener.
- Pressed the remote button to activate programming mode.
- Pressed the Learn button, followed by the remote button within 30 seconds.
- Tested operation and repeated the process for a second remote.
Outcome: Both remotes functioned perfectly, demonstrating the efficiency of following a structured programming process.
Benefits of Proper Remote Programming
- Enhanced Security: Only programmed remotes can access your garage.
- Convenience: Multiple remotes allow family members easy access.
- Compatibility: Correct programming prevents conflicts with other wireless devices.
- Reliability: Properly set remotes reduce operational failures and unnecessary troubleshooting.
LiftMaster Remote Control Programming Best Practices
- Program all remotes at the same time to save effort.
- Keep a record of the remote models and their button assignments.
- Regularly check for firmware updates if using smart-enabled remotes.
- Avoid programming near devices that emit strong radio signals.
Following these best practices ensures that your LiftMaster remote control programming remains efficient and hassle-free.
FAQs
1. How do I program a LiftMaster remote control?
Locate the opener’s Learn button, press it, then press the desired button on the remote. Follow model-specific steps.
2. Can I use any remote with my LiftMaster opener?
Not all remotes are compatible. Check your model to ensure proper operation.
3. How do I reset a LiftMaster remote?
Press and hold the opener’s Learn button for about 10 seconds to erase previous codes. Then reprogram your remotes.
4. Why isn’t my LiftMaster remote working after programming?
Check batteries, ensure the remote is within range, and verify no signal interference from other devices.
5. Can I program multiple remotes at once?
Yes, but it’s best to do them sequentially within the programming session to avoid conflicts.
6. Does LiftMaster remote programming affect my opener settings?
No, programming a remote does not alter other opener configurations.
7. Is there a mobile app option for programming?
Some newer LiftMaster models support smart hub apps for remote programming and operation control.
Conclusion
Proper LiftMaster remote control programming ensures your garage system operates smoothly, securely, and conveniently. By following step-by-step instructions, maintaining your remote, and troubleshooting common issues, you can enjoy reliable access for years to come.
Take control of your garage today program your LiftMaster remote and experience the convenience firsthand!